
Creating a professional GitHub Profile using Markdown
In this tutorial, I will show you how I created my GitHub profile Century300 using Markdown. You are welcome to copy the source code here.1. The basic
- In GitHub, you can create a new repository name GitHubUserName and add the README.md in that repository. This file will replace the default GitHub profile. In my case, I made a repository named Century300.
- The GitHub README.md uses Markdown. Markdown and HTML are mark-up languages, but Markdown source is easier to read and write than HTML.
- I used shields.io to create all the badges on my profile.
- You can search emoticons online, such as after searching for “waving hand” 👋 on emojipedia.org, you can copy and paste it to your README.md document. Please note different devices/ browsers/ software will display 👋 differently, but all will point to the underlying codepoint U+1F44B. If you use VSC, you should install the extension :emojisense: and ctrl+I to open Emoji Picker.
2. Creating badges on Shields.io
I will show you how I created the following badges on my profile:
Technologies
- The syntax:
- Markdown: 
- You can also use HTML syntax in GitHub README.md: <img alt=”Name” src=”https://img.shields.io/xxxx”>
- Here is the syntax for shields.io: https://img.shields.io/badge/
- Here is my source code:


- Note you can manually type &logo=xxxx&style=for-the-badge directly into the source code.
- The technologies badges are a little more tricky:
- To omit the “message part” and add the “logo” to the badge, the shields.io syntax should be https://img.shields.io/badge/TechonologyName-ColorName?style=xxxx&logo=xxxx. Example: , and you will see the display of
- style=for-the-badge is bigger than style=flat-square. For-the-badge will capitalize the technologyName.
- You can also specify &logoColor=white and &labelColor=xxxx and &color=xxxx.
- If the logo is not in the database of shields.io, such as &logo=bash, but you do want to put that logo in your technology profile, you can check out this repo or do the following using shields.io:
- shields.io bottom page has instruction for ?logo=data:image/png;base64,… This means you can add a custom logo page to the badge by encoding the logo picture using base64. The shields.io limit is 8192 bytes (or 8kB), but GitHub sometimes does not allow a too-long URL, so you should save/ convert the image to less than 6kB. Here is an example from the official website:
- Google search for the custom logo. In this case, bash logo, then save it to your computer.
- Resize it to a smaller size. I recommend 100 x 100 pixels in .jpg using the free online image resizer ivertech.com.
- Use the free online Base64 Image Encoder to upload the jpg above and paste the base64 encode image version into the README.md source code in place of the xxxx here: &logo=data:image/jpg;base64,xxxx.
- That is all, you can see my custom Bash badge example under the technology list above.
3. Connect with me section
- Here is my source code example:


[<img align="left" alt="nd-cyber.com" width="35px" src="https://www.svgrepo.com/show/46221/globe.svg" />][website]
[<img align="left" alt="nd-cyber | Twitter" width="35px" src="https://www.svgrepo.com/show/157815/twitter.svg" />][twitter]
[<img align="left" alt="nd-cyber | Facebook" width="35px" src="https://www.svgrepo.com/show/138943/facebook.svg" />][facebook]
[<img align="left" alt="nd-cyber | Patreon" width="35px" src="https://www.svgrepo.com/show/331529/patreon-v2.svg" />][patreon]
[<img align="left" alt="nd-cyber | GitHub" width="35px" src="https://www.svgrepo.com/show/217753/github.svg" />][github]
[<img align="left" alt="nd-cyber | YouTube" width="35px" src="https://www.svgrepo.com/show/95009/youtube.svg" />][youtube]
- You can search the logo online, then right-click > open the image in a new tab > copy the URL link. In my case, I went to svgrepo.com and searched for the logo name there.
- You can type the websites inside the square bracket [ ], or you can specify the website later at the bottom of README.md
[website]: https://nd-cyber.com
[twitter]: https://twitter.com/nd_cybersec
[facebook]: https://www.facebook.com/ndcyber
[patreon]: https://www.patreon.com/NDcyber
[github]: https://github.com/century300
[youtube]: https://www.youtube.com/channel/UCVsmmOPP9L42oTOlpYtojGQ- Also, you should always use the alt= attribute to provide alternative information for an image if a user cannot view it (or the users purposely block pictures and only see text in their web browsers).
4. Blog post workflow
- You can follow the official instruction from gautamkrishnar/blog-post-workflow. This repository will help you to update your GitHub profile with YOUR latest blogs and YOUR latest YouTube videos.
- Add the following section to your README.md file
# Blog posts
<!-- BLOG-POST-LIST:START -->
<!-- BLOG-POST-LIST:END -->
- Create a new file named blog-post-workflow.yml inside a folder name .github/workflows
name: Latest blog post workflow
on:
  schedule: # Run workflow automatically
    - cron: '0 * * * *' # Runs every hour, on the hour
  workflow_dispatch: # Run workflow manually (without waiting for the cron to be called), through the Github Actions Workflow page directly

jobs:
  update-readme-with-blog:
    name: Update this repo's README with latest blog posts
    runs-on: ubuntu-latest
    steps:
      - name: Checkout
        uses: actions/checkout@v2
      - name: Pull in dev.to posts
        uses: gautamkrishnar/blog-post-workflow@master
        with:
feed_list: "https://nd-cyber.com/feed"- Replace the above URL list with your RSS feed URLs. In my case, my personal blog feed is https://nd-cyber.com/feed
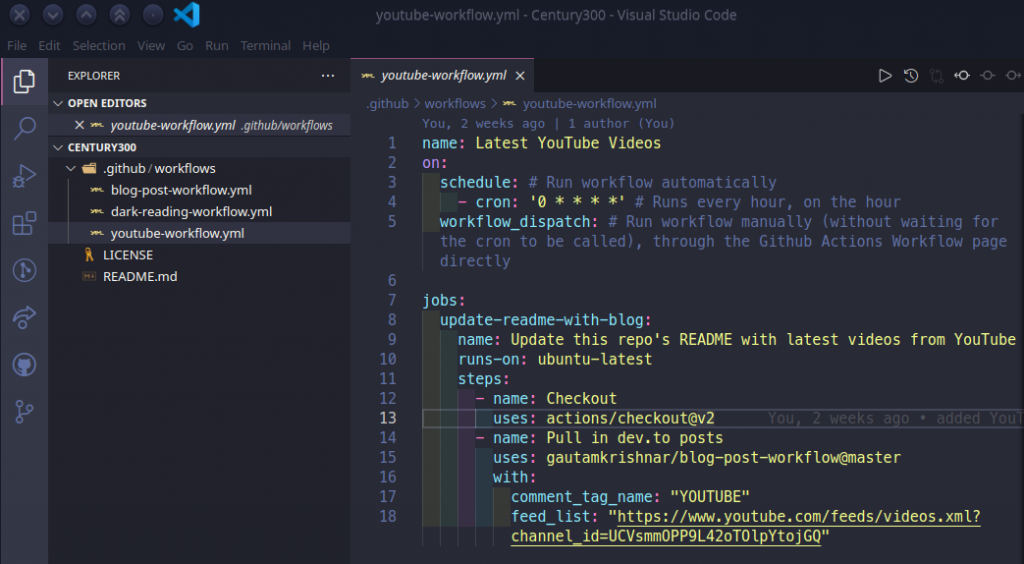
- You can also add a section for YouTube’s latest videos on your GitHub profile. Your YouTube feed URL should be https://www.youtube.com/feeds/videos.xml?channel_id=THE_CHANNEL_ID_HERE, such as mine is “UCVsmmOPP9L42oTOlpYtojGQ” in https://www.youtube.com/channel/UCVsmmOPP9L42oTOlpYtojGQ.
- In your README.md, you can add the following:
### 📺 Latest YouTube Videos
<!-- YOUTUBE:START -->
<!-- YOUTUBE:END -->- Then you create a file name youtube-workflow.yml in .github/workflows/ and copy the following. Please note the comment_tag_name: “YOUTUBE”
5. GitHub Readme Stats
- You can follow instructions on the official repository anuraghazra/github-readme-stats.
- All you need to do is to change the ?username= value to your GitHub username:
[](https://github.com/anuraghazra/github-readme-stats)- I like the radical theme, so I added &theme=radical after my GitHub username.
- You can also add the Top Language with a compact layout and radical theme as follows:
[](https://github.com/anuraghazra/github-readme-stats)6. Adding pictures:
- You can add any picture to GitHub by drag-and-drop the image into README.md. GitHub will automatically upload it and give you a custom link, such as https://user-images.githubusercontent.com/xxxx, or you can copy the picture URL from online searching.
- The syntax should be: <img align=”right” alt=”PictureName” src=”https://user-images.githubusercontent.com/xxxx.png” width=”400″ height=”250″ />. You should specify the width and height to fit your profile.